Actually,
this should be Battlezones by Mantic, a life, the universe and
everything guide, but there wasn't room in the title space. So, to
start, this is my personal opinion, if you don't like it, write your
own! I bought Mantic's Industrial and Urban sectors (so far I've
only been allowed to open the industrial sector though!) and the
first thing I did when I opened the box was search for a guide as to
what is what and what the possibilities were with the set. I then
panicked as there is no guide and very little in the box makes any
sense at first glance.
I closed
the box and put it to the rear of my self, then resorted to Google.
Every post I found said the same thing, namely, why isn't there any
sort of guide provided with Battlezones? On their site, Mantic
states that one is on the way, but as that was written in 2012, I
wouldn't hold your breath! Fortunately Mr Anthony Bragg, check him
out on Google+, has been a huge help and put me onto The Terrain
Tutor on You Tube. Mr T's videos are brilliant and he covers almost
everything you will ever need to know about terrain, but he doesn't
tell you what is what with Battlezones. Hence this guide.
I've tried
to do a bit of a comparison to give you some idea of what Battlezones
is like in the wargaming field. The boss of Mantic compares it to
Lego in their videos, but personally I would compare it to Games
Workshop.
Lego was
brilliant when I was even younger than I am now:) It is versatile to
the point that if you don't like what you build you can take it apart
and start again and back in the day, it offered value for money.
However, it is hardly suitable for use in the majority of wargames.
I love GW,
to my mind it is the bench mark that all other wargame's businesses
have to follow and as an extra bonus, it is English and therefore
deserving of our support. Their terrain, like their figures, is of
brilliant quality and fits perfectly with the background of their
scifi games. Another personal plus is that what you see on the box
is what you get. But, to add a more personal touch to the terrain,
you need to be experienced and able to add intricate bases to make
your customisations look good.
Despite
Mantic's claims to the contrary, you cannot reuse the pieces in their
sets like you can with Lego. The connectors simply are not strong
enough and you do not get enough of them. Neither is the quality of
the pieces up to that of Games Workshop, although that is largely
down to the fact that whoever takes them off their frames obviously
doesn't love what they are doing.
Where
Battlezones comes into its own is its versatility. You could buy ten
of the same kit and not build the same building twice. It is
brilliant. Better still, it is perfectly suited to wargaming as long
as you have your background story right. What do I mean? If you are
fighting your battles on a planet with millions of years of history,
you are probably better off buying Games Workshop terrain. But if
your battles are set in an environment like the TV show Defiance,
Battlezones is just what you need. It looks functional, rather than
artistic, perfectly suited to colonists who want easy to assemble
buildings that will provide them with shelter, safety and protection.
It also fits in perfectly with what I had in mind when I wrote my
wargames rules.
So, onto
my review of the Battlezones industrial sector. Yes, I can hear your
sighs of 'At last.'
What You Get:
90º
and straight connectors
Walls
and extras
Roofs
and extras
Extras
1
Extras
2
Urban
sprues
You
will need; cutters; long-nosed pliers; a file; Stanley knife and lots
of super glue. You will also need something to use as a base for
your buildings as they are too flimsy for gaming use otherwise. I
used some cork place mats.
You
do not get enough connectors and the 90º
ones are enough to make a sane person wish to commit seppuko. My
first effort, I ended up with more pieces super glued to my fingers
than to each other. For my second attempt, I either left them out,
or cut one of the pegs down to a triangle, then super glued them.
They are a particular pain when trying to fix roofs to walls as
A
– they leave the roof section sitting proud of the wall
B
– you are likely to wreck the wall and everything else attached to
it when you try to push the roof onto the connector.
The
'risers' are brilliant though and are an excellent way of joining
walls together. But whatever connectors you use, you are better off
gluing everything to give it some stability.
The
connectors work by pushing/forcing their pegs into the holes in the
walls, etc. It is a good idea to use long-nosed pliers to squeeze
them into place after putting glue on the pegs. BUT ensure that you
have planned what you want to build first, as you will only get one
attempt.
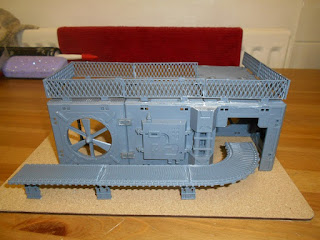
My
first attempt after judicial use of filler. By this stage I was not
a happy chappie and wished I had gone for GW terrain instead.
Luckily
my second attempt turned out better because I had come to terms with
the limitations on the connectors. If you want to use the conveyor
belts though, I suggest you cut the supports in half as otherwise the
conveyors are virtually at the top of the doorways.
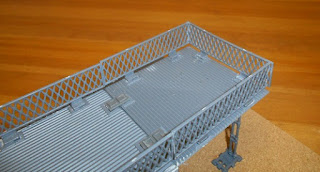
If
you want to do corners with the railings or walkways, you are going
to have to do some cutting, as they won't sit together properly
otherwise. Not a big deal, but worth bearing in mind.
I
haven't finished painting my buildings yet, but I will post a picture
of the finished factory once I have. If you want to see some decent
paint jobs, see Anthony Bragg on Google+.
Unfortunately
I don't have a spray gun any more, nor anywhere to spray without my
wife divorcing me, so my efforts are totally with a brush and I think
spraying would look a lot better.
I
hope you have found this useful and I wish you all happy wargaming.
Mark


Interesting insight into your beginnings of mantic terrain building and thank you for the shout out for mel and I......I really like the look of the lowered conveyor belt and may try that myself next time just for variation.I will add that the more you build and learn the limitations of certain pieces and techniques of the connectors, the more construction of buildings becomes easier and therefore increasingly satisfying.As shown by your second attempts.
ReplyDeleteThank you Anthony, I've got some more to add to the post as I've just used the urban buildings which are, in my opinion, much better. But whatever I do will never be as god as yours:(
DeleteConsidering you where worried about all the parts and no instructions you've done a grand job.
ReplyDeleteThank you Russ. You are such an awesome friend:)
ReplyDelete